Automating with HID Devices: When the Anti-Cheat Eats Your Inputs
The story of why software key injection stopped working, how an Arduino HID keyboard saved the project, and how the whole pipeline actually runs.
tutorial / arduino / hid / automation / anti-cheat / reverse-engineering / windows
One of the biggest mistakes I made while building this fishing bot was assuming I could just send keys from the PC and the game would listen. Spoiler: it did not. I lost a full weekend to SendInput, PostMessage, and every Windows input trick I could find, only to watch the game ignore every single one of them.
The mini-game is simple. A green safe zone slides around, a yellow cursor tries to stay inside it, and you tap A, D, and F to keep things under control. Automating the decision part was easy. Automating the actual key pressing was the hard part, because the game runs under anti-cheat that discards synthetic input.
In this breakdown, I will walk through the full pipeline I ended up with: a C++ Windows app that watches the screen, an Arduino that pretends to be a USB keyboard, and the small serial protocol that glues them together. It is not about being invisible; it is about moving the input to a place the anti-cheat already trusts.
Why Software Input Injection Dies
Most beginner automation scripts start with something like this:
import pyautogui
pyautogui.press('f')
On a normal desktop app, it works. On a game with a real anti-cheat, it usually does not. The game sees the event, the anti-cheat sees the event, and the anti-cheat decides it did not come from a real keyboard. There are a few layers that can kill it:
- Kernel-level anti-cheat hooks the input stack and checks the source of every input event.
- Raw Input / DirectInput filtering rejects or flags synthetic events.
- Window message filtering drops
PostMessage/SendMessagekeys if they never passed through the hardware path. - Heuristic detection looks at timing, regularity, and whether the event came from a device with a real HID descriptor.
When any of those layers decides your keypress is fake, the game drops it silently. Your bot thinks it pressed F. The game thinks nothing happened. I went through this cycle enough times that I started questioning my sanity.
flowchart TB
    MACRO["User Macro / Bot"] --> KEYS["Generates Keypress (e.g. F)"]
    KEYS --> AC["Kernel-Level Anti-Cheat Driver"]
    AC --> HID{"Is Legitimate HID Device?"}
    HID -->|Yes| ALLOW["Allows Event<br/>Game Updates State"]
    HID -->|No| DROP["Drops Event Silently<br/>Game Ignores Input"]
Software key events get filtered before the game ever acts on them.
The fundamental problem is that you are asking the OS, which the anti-cheat is also watching, to forge input on your behalf. It can inspect, validate, and discard those forgeries at several points. The only real fix is to make the input come from an actual hardware device.
The HID Loophole
HID stands for Human Interface Device. Every USB keyboard, mouse, and gamepad speaks HID. When you plug a keyboard into Windows, the OS does not interrogate the keyboard about where its keypresses came from. It accepts the HID reports because the device is trusted at the bus level.
The trick, then, is obvious: make a microcontroller pretend to be a USB keyboard. The game sees a normal keyboard. The anti-cheat sees a normal keyboard. And your keypresses are treated as real hardware events because, as far as the OS is concerned, they are.
flowchart TB
    HOST["Host PC"] -->|"Serial Commands (Press W) — Untrusted Software Command"| CTRL["HID Emulation Controller"]
    CTRL -->|"USB HID Keyboard Reports — Trusted Hardware Event"| HW["Hardware Interface<br/>(Keyboard and Mouse)"]
    HW -->|"Target PC Sees Trusted HID"| TARGET["Target PC (Game Process)"]
PC sends serial commands; the Arduino converts them into real USB HID keyboard reports.
This is why boards like the Arduino Leonardo, Arduino Micro, and SparkFun Pro Micro are so common for this kind of work. Unlike a classic Arduino Uno R3, they use an ATmega32u4 with built-in USB support, so they can expose a composite USB device that includes a HID keyboard interface. The newer Arduino Uno R4 can do it too. A plain Uno R3 will not work here because its USB connection is handled by a separate serial converter chip that cannot act as a keyboard.
The Full Pipeline
The final bot has two brains:
- PC Brain — captures the screen, runs computer vision, decides what to do, and sends commands over USB serial.
- Arduino Brain — listens on serial, translates commands into
Keyboard.press()/Keyboard.release()calls, and emits real HID events.
This split is necessary. The Arduino cannot read the screen, and the PC cannot easily inject trusted input. Together they form a hybrid automation system that is hard to block at the input layer.
Step 1: Screen Capture
The C++ app captures only a small rectangle around the fishing meter using Win32 GDI. A full-screen grab would be wasteful; the meter is roughly 964 × 58 pixels, so that is all we ask for.
bool ScreenCapture::capture_roi(const RoiConfig& roi, std::vector<std::uint8_t>& pixels,
                                int& width, int& height) const {
    width  = roi.width;
    height = roi.height;

    std::unique_ptr<void, GdiDeleter> desktop_dc{
        GetDC(nullptr), {GdiDeleter::Type::DC_RELEASE, nullptr}};

    std::unique_ptr<void, GdiDeleter> memory_dc{
        CreateCompatibleDC(static_cast<HDC>(desktop_dc.get())),
        {GdiDeleter::Type::DC_DELETE, nullptr}};

    std::unique_ptr<void, GdiDeleter> bitmap{
        CreateCompatibleBitmap(static_cast<HDC>(desktop_dc.get()), roi.width, roi.height),
        {GdiDeleter::Type::OBJ_DELETE, nullptr}};

    HGDIOBJ previous_bitmap = SelectObject(static_cast<HDC>(memory_dc.get()),
                                           static_cast<HBITMAP>(bitmap.get()));

    BitBlt(
        static_cast<HDC>(memory_dc.get()), 0, 0, roi.width, roi.height,
        static_cast<HDC>(desktop_dc.get()), roi.left, roi.top,
        SRCCOPY | CAPTUREBLT
    );

    // GetDIBits pulls the pixel bytes into `pixels`...
}
The SRCCOPY | CAPTUREBLT flags matter because they copy pixels even if layered windows or overlays are involved. Some games composite UI through layers that a plain SRCCOPY might skip.
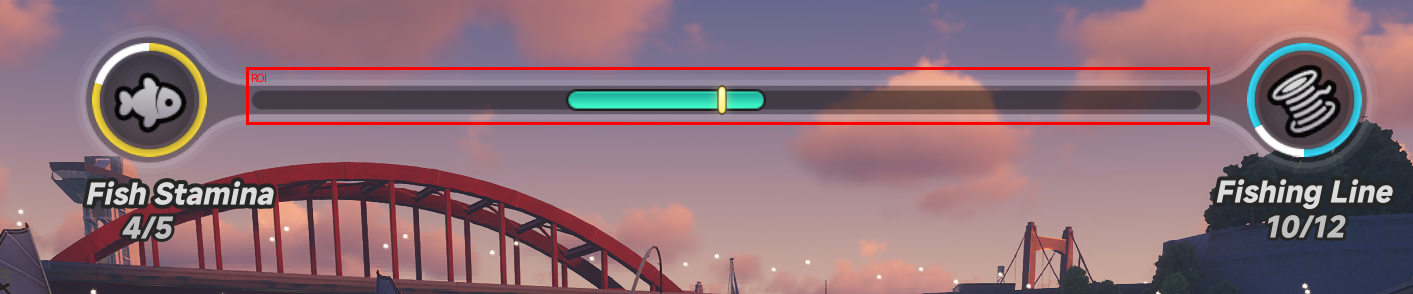
A tight ROI around the fishing meter keeps the capture cheap and predictable.
Step 2: Vision
The fishing meter has three visual pieces:
- A green safe zone that defines where the cursor should be.
- A yellow vertical cursor bar that slides left and right.
- Inputs
AandDthat nudge the cursor, andFthat interacts when the cursor is inside the green zone.
We do not need machine learning. We just compare pixel colors using Euclidean distance in RGB space and scan the middle row of the ROI. Since the meter is a horizontal bar, the middle row is enough.
bool FishingVision::matches_color(const std::uint8_t* bgra_pixel,
                                  const ColorConfig& target) {
    const int red   = static_cast<int>(bgra_pixel[2]);
    const int green = static_cast<int>(bgra_pixel[1]);
    const int blue  = static_cast<int>(bgra_pixel[0]);

    const int dr = red   - target.red;
    const int dg = green - target.green;
    const int db = blue  - target.blue;

    const int tolerance_sq = target.tolerance * target.tolerance;
    const int distance_sq  = dr * dr + dg * dg + db * db;
    return distance_sq <= tolerance_sq;
}
Why only the middle row? Because the green bar and the yellow cursor span the full height of the meter. Scanning one row lets us find the left and right edges of the green zone and the center of the cursor, while keeping the vision loop fast enough to run at 60 FPS.
FrameDetection FishingVision::analyze(const std::vector<std::uint8_t>& pixels,
                                      int width, int height,
                                      const RoiConfig& roi) const {
    const int mid_row = height / 2;
    const std::uint8_t* row = pixels.data()
                              + static_cast<std::size_t>(mid_row)
                              * static_cast<std::size_t>(width)
                              * kBytesPerPixel;

    int first_green = -1, last_green = -1;
    long long cursor_sum = 0;
    int cursor_count = 0;

    for (int x = 0; x < width; ++x) {
        const std::uint8_t* pixel = row
                                  + static_cast<std::size_t>(x)
                                  * kBytesPerPixel;

        if (matches_color(pixel, safe_zone_)) {
            if (first_green < 0) first_green = x;
            last_green = x;
        }

        if (matches_color(pixel, cursor_)) {
            cursor_sum += x;
            ++cursor_count;
        }
    }

    // green_start, green_end, cursor_x are derived here
}
A single-row scan gives us the green zone boundaries and the cursor center.
Step 3: Decision
Once we know where the green zone and cursor are, the decision is simple:
- Cursor left of the green zone → hold
D. - Cursor right of the green zone → hold
A. - Cursor inside the green zone → tap
Fand release movement keys. - Nothing detected → release everything.
const bool in_zone = det.cursor_x >= det.green_start
                  && det.cursor_x <= det.green_end;

if (in_zone) {
    key_state.set_hold(serial, 'A', false);
    key_state.set_hold(serial, 'D', false);
    key_state.tap(serial, 'F');
} else if (det.cursor_x < det.green_start) {
    key_state.set_hold(serial, 'A', false);
    key_state.set_hold(serial, 'D', true);
    key_state.set_hold(serial, 'F', false);
} else {
    key_state.set_hold(serial, 'D', false);
    key_state.set_hold(serial, 'A', true);
    key_state.set_hold(serial, 'F', false);
}
On top of this, there is a small state machine that tracks the wider game flow: waiting for a fish, hooking, reeling, finishing, and recovering back to the menu. The main loop also has a few watchdogs that press ESC if the bot gets stuck, which is surprisingly important in practice.
Step 4: Serial Protocol
The PC sends compact two-character commands, each terminated by a newline:
| Command | Meaning |
|---|---|
A1 | Press and hold A |
A0 | Release A |
D1 | Press and hold D |
D0 | Release D |
F1 | Press F |
F0 | Release F |
E | Tap ESC |
A KeyStateCache on the PC side prevents sending the same command repeatedly:
bool KeyStateCache::set_hold(SerialLink& link, char key, bool down) {
    bool* tracked_state = nullptr;
    switch (key) {
        case 'A': tracked_state = &a_down_; break;
        case 'D': tracked_state = &d_down_; break;
        case 'F': tracked_state = &f_down_; break;
        case 'E': tracked_state = &e_down_; break;
        default:  return false;
    }

    if (*tracked_state == down) return true;

    *tracked_state = down;
    return link.send_command(command_for(key, down));
}
This keeps the serial line quiet and stops the Arduino from drowning in redundant HID reports.
Step 5: Arduino HID Firmware
The Arduino side is intentionally dumb. It knows nothing about fishing. It only knows how to turn serial bytes into HID keyboard events:
#include <Keyboard.h>

char command_buffer[4] = {0, 0, 0, 0};
unsigned int command_index = 0;

bool a_down = false;
bool d_down = false;
bool f_down = false;

unsigned long f_release_at = 0;

void handle_command(char key, char state) {
    const bool down = state == '1';

    switch (key) {
    case 'A':
        if (down) { if (!a_down) { Keyboard.press('A'); a_down = true; } }
        else      { if (a_down)  { Keyboard.release('A'); a_down = false; } }
        break;
    case 'D':
        if (down) { if (!d_down) { Keyboard.press('D'); d_down = true; } }
        else      { if (d_down)  { Keyboard.release('D'); d_down = false; } }
        break;
    case 'F':
        if (down) {
            if (!f_down) { Keyboard.press('F'); f_down = true; }
            f_release_at = millis() + 50;  // auto-release after 50 ms
        } else {
            if (f_down) { Keyboard.release('F'); f_down = false; }
            f_release_at = 0;
        }
        break;
    case 'E':
        digitalWrite(LED_BUILTIN, HIGH);
        delay(100);
        digitalWrite(LED_BUILTIN, LOW);
        Keyboard.press(KEY_ESC);
        delay(20);
        Keyboard.release(KEY_ESC);
        break;
    }
}
Keyboard.press('A') and Keyboard.release('A') come from the Arduino HID library. They send real USB HID keyboard reports with the correct usage ID for the letter A. Windows receives those reports exactly as it would from any Dell, Razer, or Logitech keyboard. The anti-cheat has no reliable way to tell the difference.
Why This Works at the USB Level
When a USB keyboard is plugged in, the host asks for its HID report descriptor. This descriptor basically says: “I am a keyboard. I have six normal keys and eight modifier keys. Here is the format of my reports.” The Arduino Keyboard library provides a standard descriptor, so the OS enumerates the board as a regular keyboard.
After enumeration, every HID report is a small packet, typically eight bytes:
Byte 0: modifier keys (Ctrl, Shift, Alt, GUI)
Byte 1: reserved
Bytes 2-7: up to six pressed key scancodes
When Keyboard.press('A') runs, the Arduino sends a report with byte 2 set to the scancode for A. When Keyboard.release('A') runs, it sends a report with byte 2 cleared. The OS turns those reports into window messages and key states, exactly as it does for any physical keyboard.
Because the reports originate from a real USB device driver stack, anti-cheat that blocks synthetic input at the API layer is bypassed. The input is no longer synthetic. It is a genuine hardware report from a genuine HID endpoint.
Limitations and Detection Vectors
HID automation is not magic. It is strong against input-layer detection, but a determined anti-cheat can still spot it:
- Timing analysis. Human keypresses are jittery. A bot that presses keys on a rigid 60 FPS cadence looks mechanical.
- Device fingerprinting. The Arduino HID descriptor is standard, but an anti-cheat could enumerate USB devices and flag a non-vendor board.
- Behavioral analysis. The bot always reacts within one frame, always hits the same color ranges, and never overshoots.
- Screen-capture detection. Some anti-cheats monitor whether a process is calling
BitBlt,GetDC, or using DXGI duplication.
In practice, many anti-cheat systems focus on the low-hanging fruit: injected DLLs, virtual input, and kernel-level hooks. A separate Arduino acting as a keyboard is several layers above that in difficulty, and it never touches the game process.
Calibration and Tuning
Before the bot runs, you need to tell it where the meter is and what colors to look for. Two Python helpers make this easier:
calibrate.py— captures a full-screen screenshot so you can measure the meter coordinates in an image editor.debug_vision.py— runs the same color detection as the C++ app on the calibration image and shows you exactly which pixels matched.
The C++ app reads config.json at startup:
{
    "monitor": {
        "top": 67,
        "left": 805,
        "width": 964,
        "height": 58
    },
    "green_color": {
        "target_rgb": [52, 225, 186],
        "tolerance": 40
    },
    "cursor_color": {
        "target_rgb": [249, 245, 173],
        "tolerance": 50
    }
}
This means you can tune ROI and colors without recompiling.

Calibration UI: measure the meter coordinates and paste them into config.json.
I use IrfanView for viewing my PNGs. This free tool provides a bunch of useful features such as batch processing in a folder, across folders,
bounding information and more. AS shown in the picture above, the bounds start at the first two coordinates (803, 68) and have a width x height of (964, 62). You can simply take a screen shot and mesaure the values based on your resolution.
Automating the Whole Loop
Everything mentioned above forms one successful fishing experience. We are greeted with 3 different screens over the course of starting and re-looping the mini-game. These include the main screen.
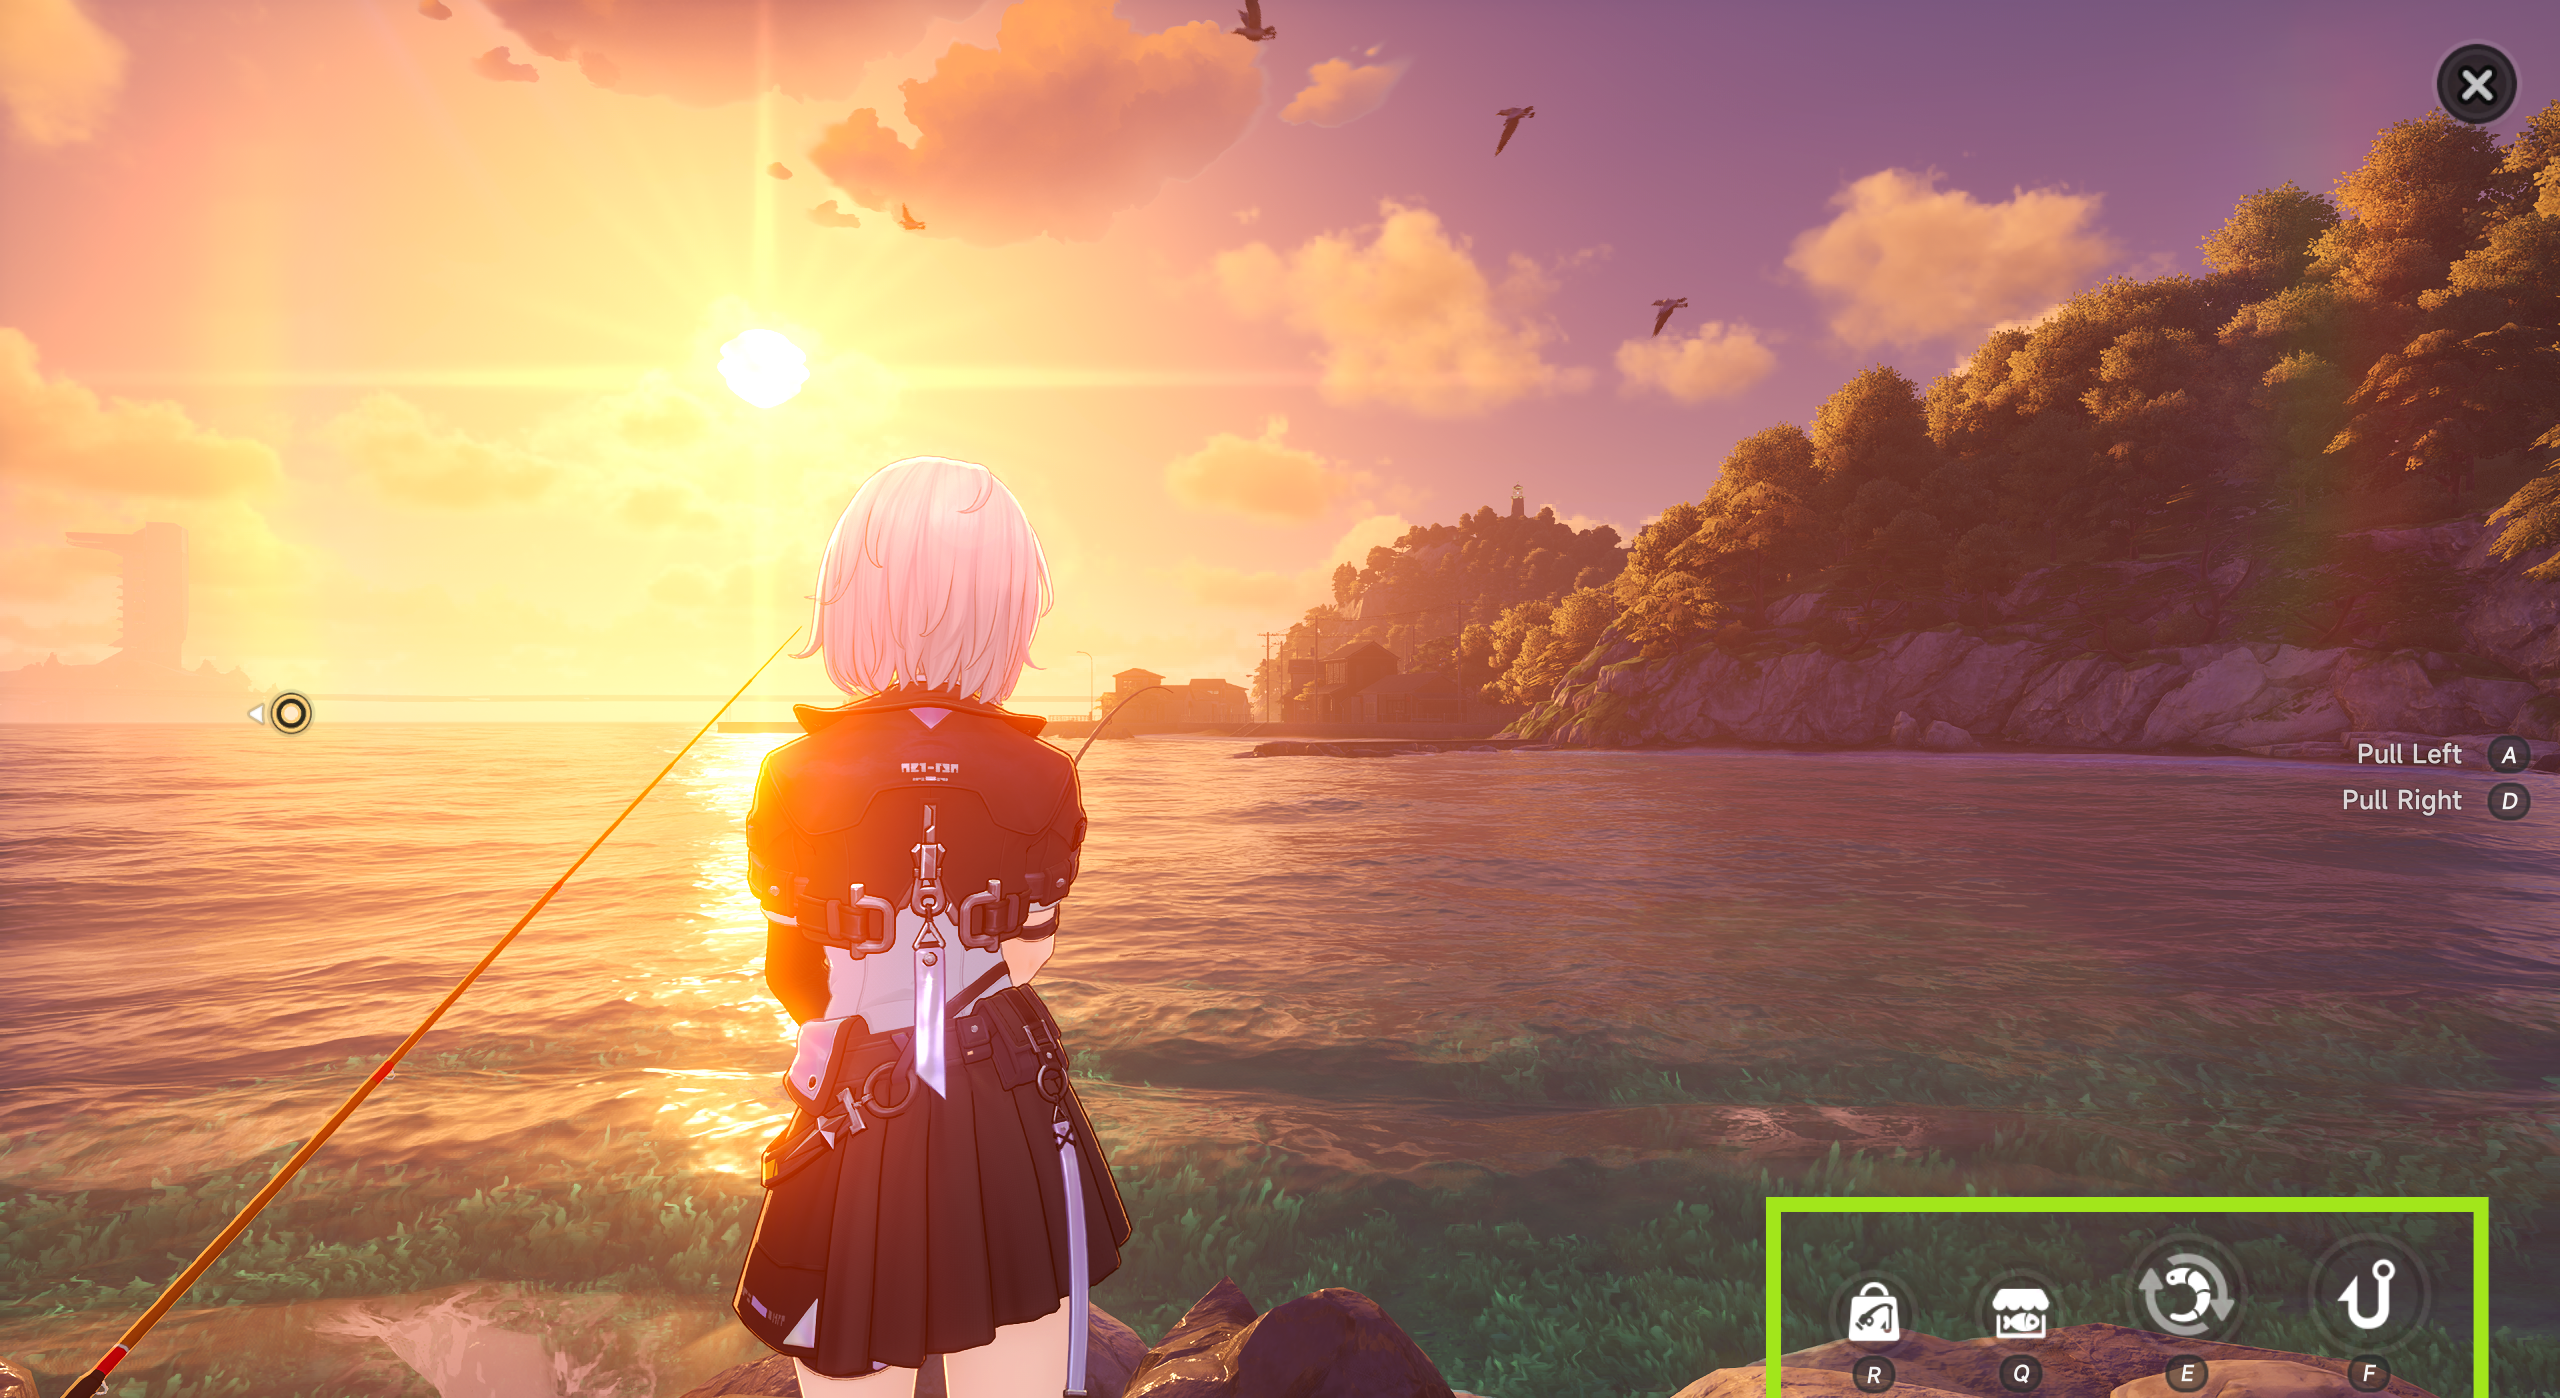
Main Screen: First screen that shows up upon entering the mini-game.
This screen presents various options at the bottom-right of the screen, such as fish market, changing bait, and starting fishing (“F”). After this there is a random wait period before the actual mini-game starts.
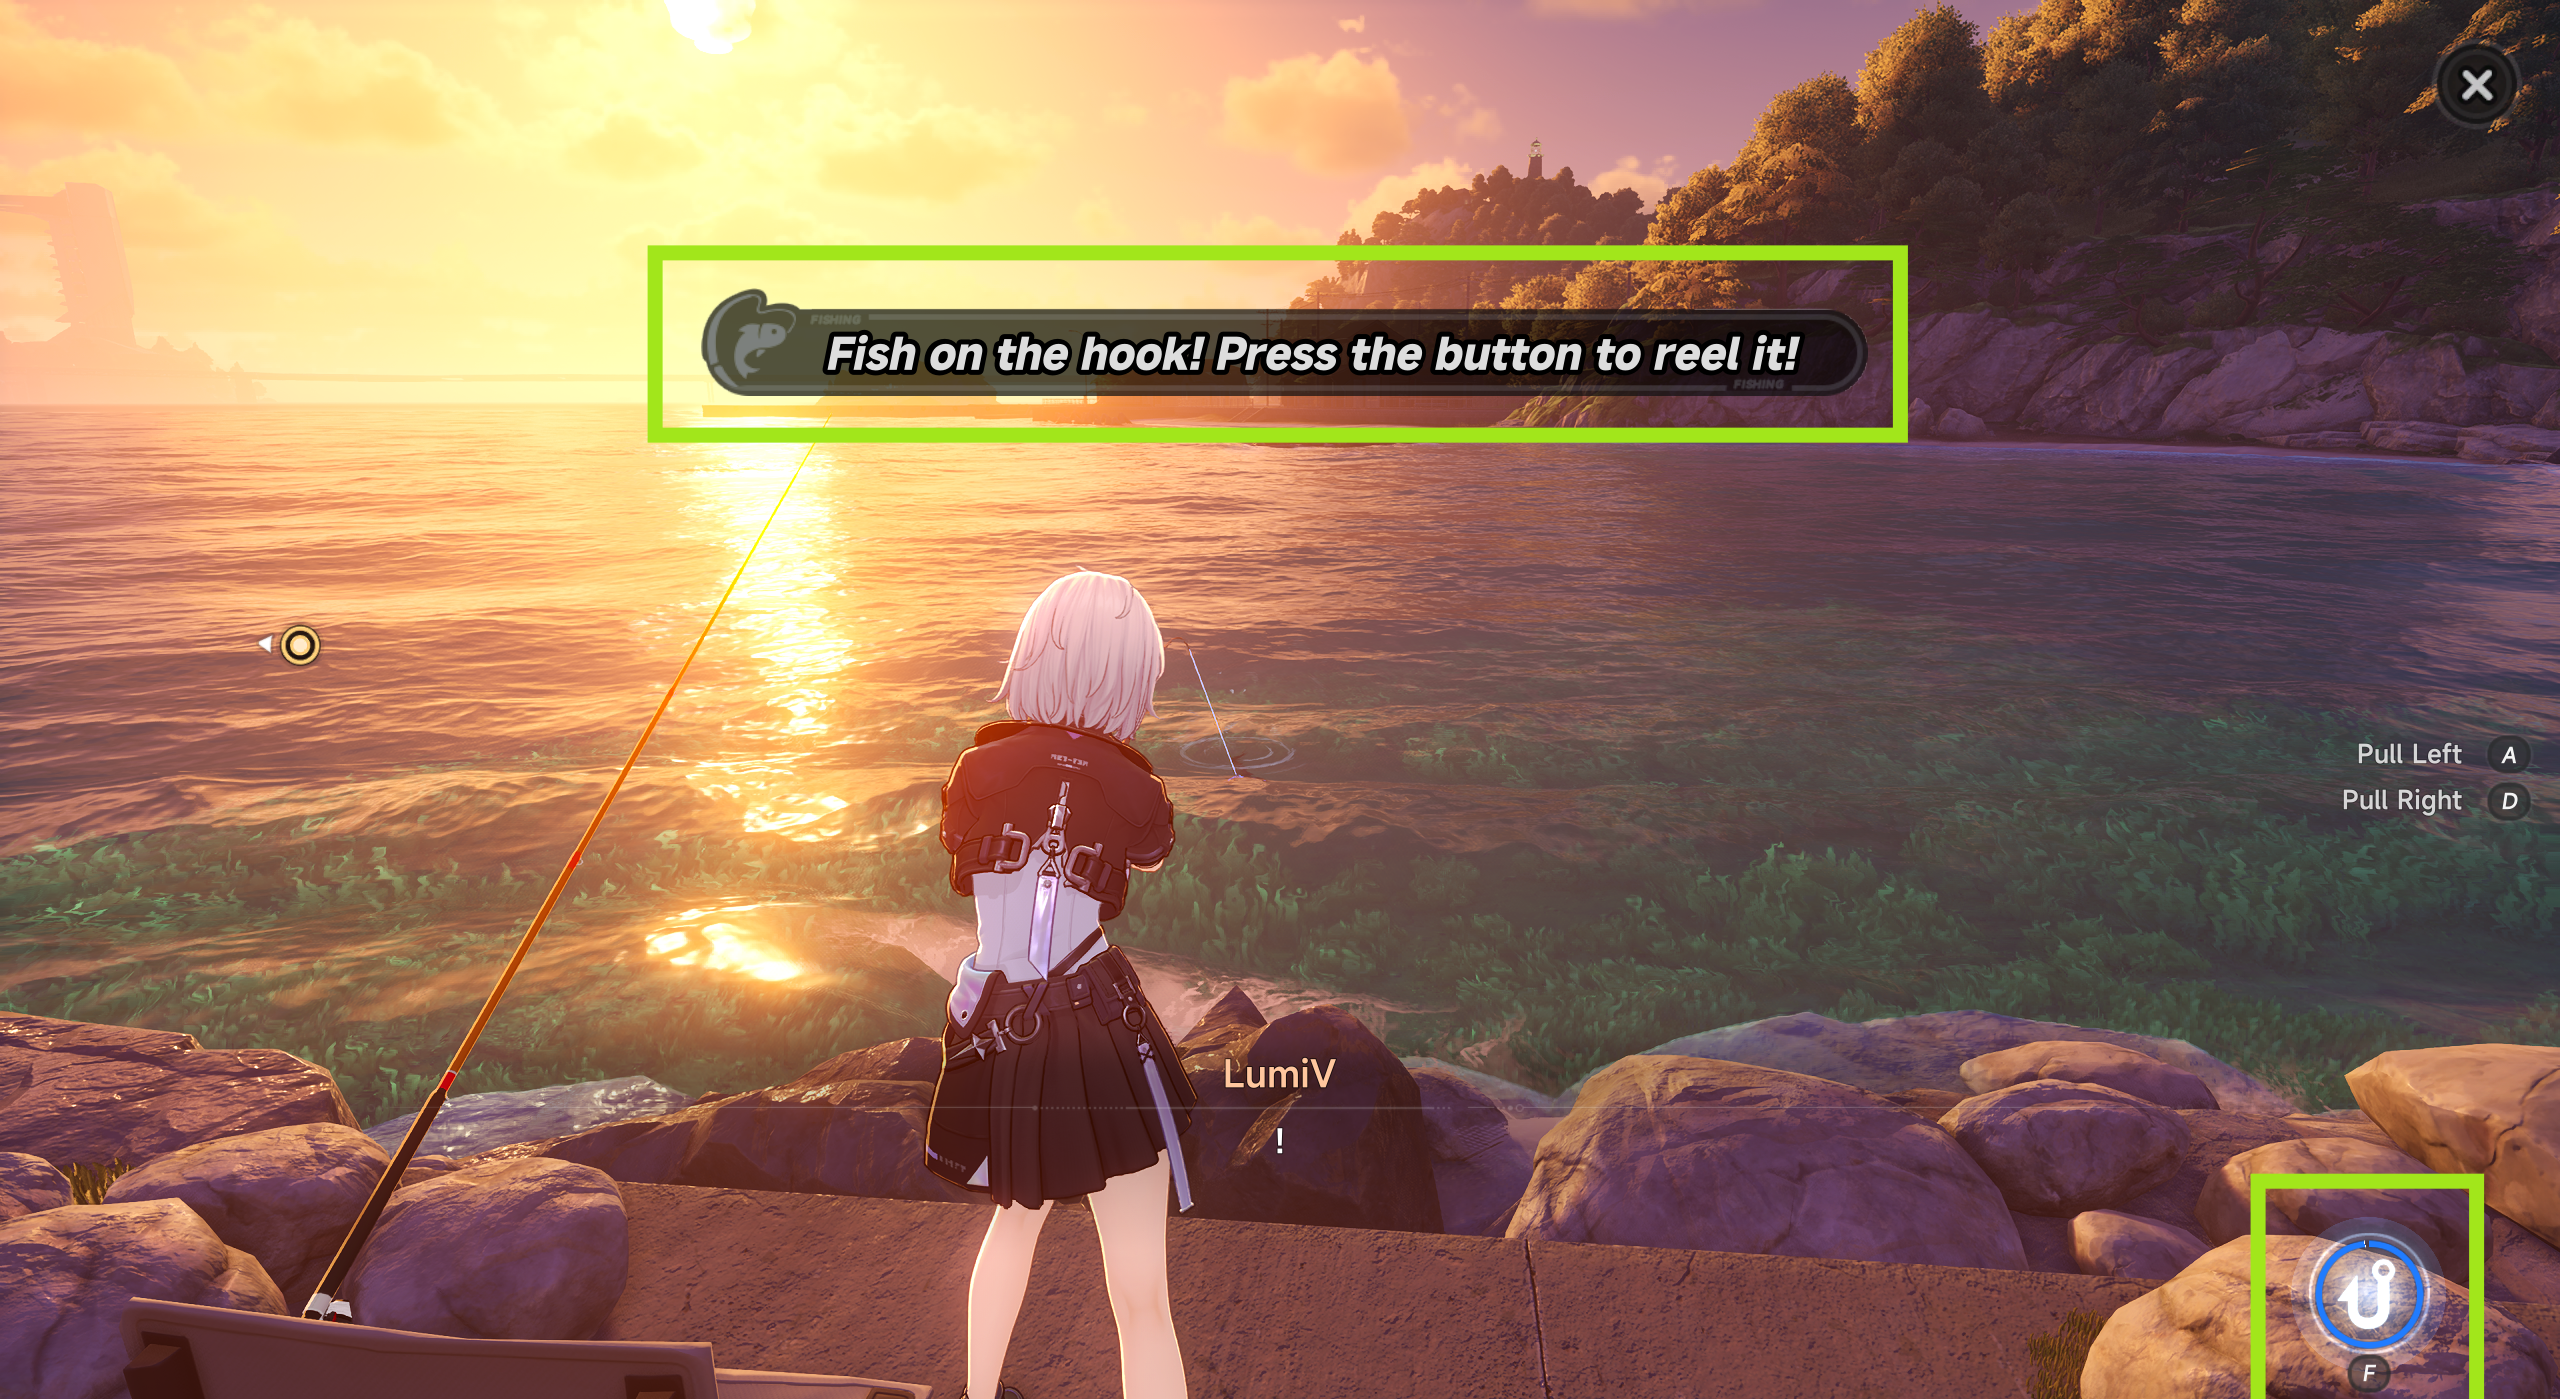
Intermediate/Pre Screen: This screen is to wait for the fish to take the bait.
No matter what you press on this screen, there will be no update/action in-game. This is a safe zone for the bot as it can spam F continuously and get into the fishing game eventually without needing any hefty vision or logic. The same logic follows the end-game, where it shows the banner of the fish caught, it details and requires the user to either press Escape or click in any empty area using the mouse. Again, for this part, the bot spams Esc at an interval of every 30 seconds, with the first one being pressed randomly between a set range of seconds (I’ve kept it between 7-11 seconds, since the average time to reach the game is 5-7 seconds). A little buffer is helpful to avoid exiting the mini- game altogether.
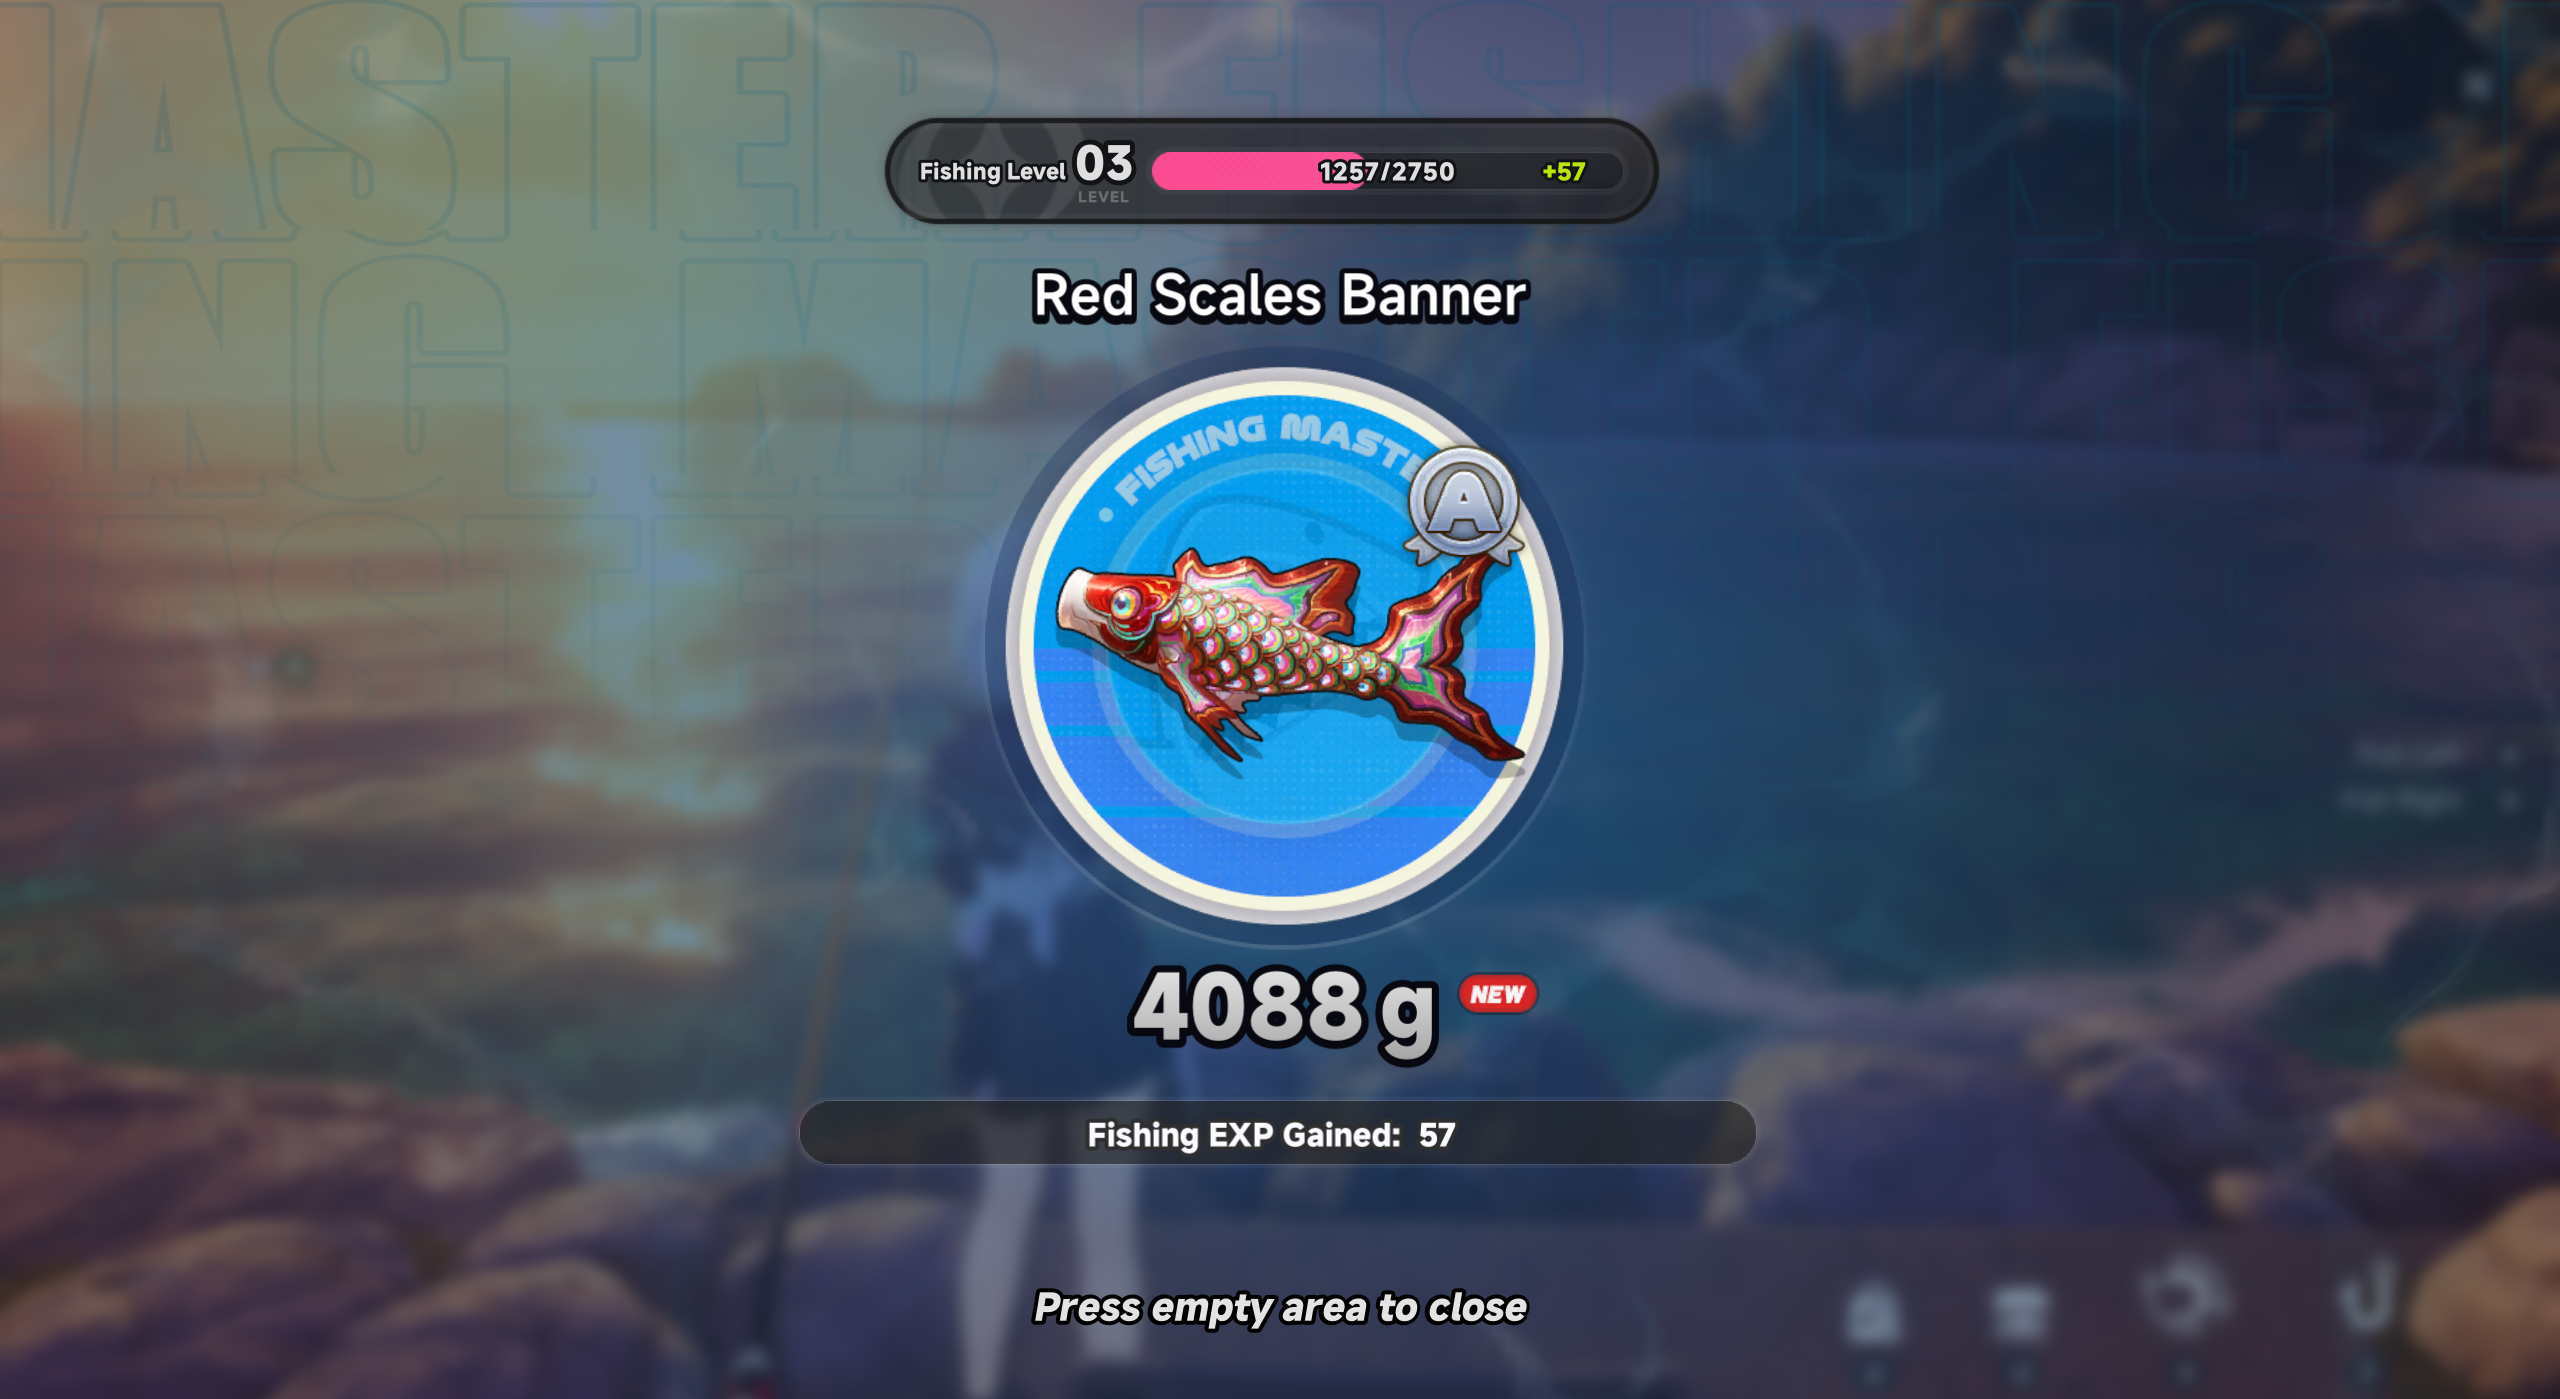
Intermediate/End Screen: This shows the fish you captured, it’s weight and requires an explicit input by the user to exit.
As you might’ve seen in the Step 5, “F” and “ESC” trigger at particular intervals. This runs throughout the runtime of the bot, making bypassing the initia and end screens very easy without requiring any extra code.
Closing Section
This bot is not about being undetectable. It is about being practical, reliable, and readable.
By moving the actual key pressing to an Arduino HID keyboard, the input bypasses the software-level blocks that anti-cheat uses. The PC still does the thinking; vision, state machine, timing. All while the Arduino provides the fingers that the OS already trusts.
Combined with a tiny ROI capture and single-row color detection, the whole loop stays fast and runs comfortably at high FPS. It is not invisible, but it is a lot harder to block and detect at the input layer than any software injector.
Intent
This was done purely for research purposes, since I seldom find the time to “fish” and I really don’t know the first thing about fishing either. I do not promote using bots for automating games. I would say this was a good learning experience to simulate a tester or something along the lines for indie studios/small teams.
Have thoughts on anti-cheat, HID automation, or fishing mini-games? Find me on Twitter or drop me an email :)
More field notes on graphics, procedural systems, tools, and pipelines are filed in the archive.
More field notes →